
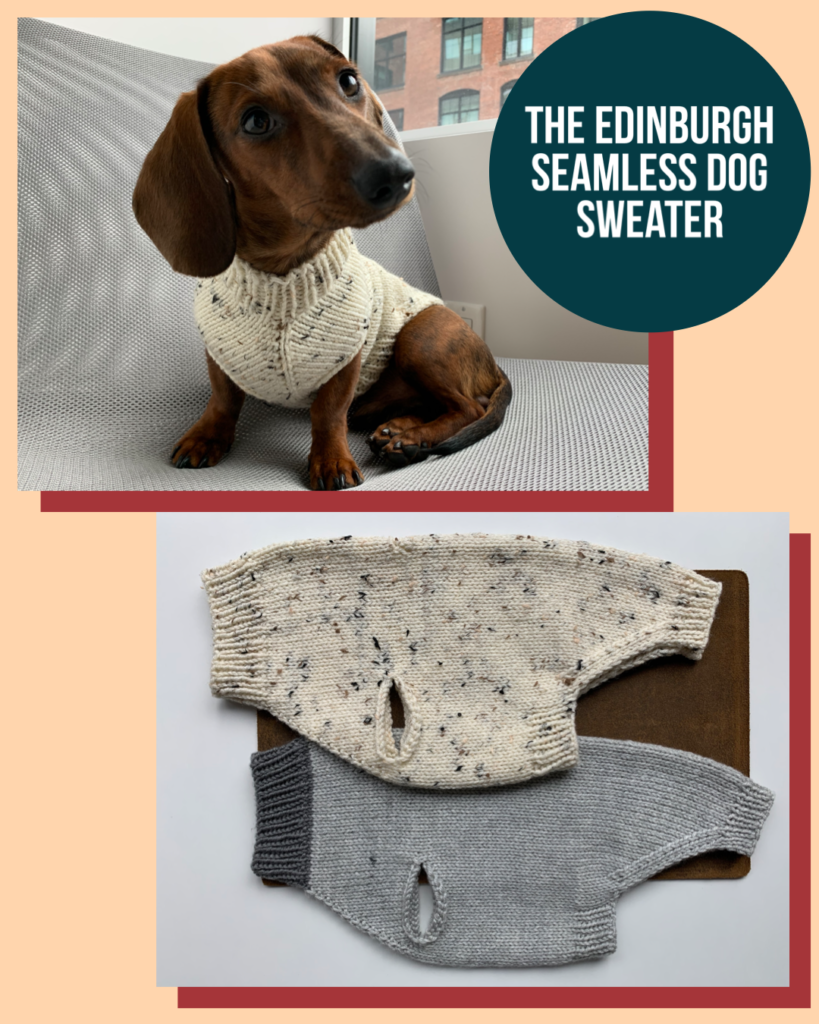
Pattern Summary
The Edinburgh Seamless Dog Sweater is worked from neck to tail with a single piece of yarn, using raglan increases. This sweater’s no-sew design makes it a great all-around dog jumper that can be made in a variety of colors and styles. Happy knitting!
Yarn
Worsted Weight Yarn (number 4 yarn). Premier Anti-Pilling Everyday Worsted in Steel and Mist and Bernat Premium Tweeds in Aran Tweed shown in pictures.
Yardage
Yardage is not provided for this pattern for two reasons: Firstly, since our furry friends come in all shapes and sizes, this pattern is designed to be highly adaptable; thus making it difficult to provide accurate yardage amounts for each size. Secondly, due to time limitations and this pattern being free, I unfortunately don’t have the bandwidth to facilitate testing calls or test each size myself. For yardage approximations, I recommend checking out how much yarn others have used for their projects on Ravelry here.
The size small that I made for my dog used 125 meters.
Thank you for your understanding!
Needles
For sizes XXS, XS, S:
Circular needles: 5 mm [US8] 30 cm [12 inches] & 4 mm [US6] 23 cm [9 inches]
For sizes M, L, XL:
Circular needles: 5 mm [US8] 40 cm [16 inches] & 4 mm [US6] 30 cm [12 inches]
Alternatively, you can use 5 mm [US8] & 4 mm [US6] double-pointed needles or 5 mm [US8] & 4 mm [US6] circular needles with a long cable for magic loop method.
Abbreviations
Sl: Slip stitch
St(s): Stitch(es)
K: Knit
P: Purl
CO: Cast on
BO: Bind off
Kfb: Knit into the front and back of the stitch. An increase.
Ssk: Slip, Slip, Knit. Left-slanting decrease.
K2tog: Knit 2 stitches together. Right-slanting decrease.
Wyif: With the yarn held in front
Sizes
XXS (XS) S (M) L (XL)
Dog Measurements
| Size | Neck | Chest | Length* |
| XXS | 21cm [8.25 inches] | 30 cm [11.75 inches] | 30 cm [11.75 inches] |
| XS | 23 cm [9 inches] | 35 cm [13.75 inches] | 35 cm [13.75 inches] |
| S | 26 cm [10.25inches] | 40 cm [15.75 inches] | 39 cm [15.25 inches] |
| M | 29 cm [11.5 inches] | 45 cm [17.75 inches] | 45 cm [17.75 inches] |
| L | 32 cm [12.5 inches] | 50 cm [19.5 inches] | 51 cm [20 inches] |
| XL | 35 cm [13.75 inches] | 55 cm [21.5 inches] | 56 cm [22 inches] |
| *The sweater length can easily be shortened or elongated to accommodate your dog’s length. | |||
Gauge
18 sts x 24 rows in stockinette stitch = 10 cm x 10 cm (with 5mm knitting needles or needles to meet gauge)
Video Tutorial
You can find the full video tutorial on YouTube here.
Downloadable Pattern
You can also download a PDF version of this pattern here.
Pattern
Neck Ribbing
Cast on 38 (42) 48 (52) 58 (64) Sts on 4 mm [US6] 23 cm [9 inches] circular needles (for sizes XXS, XS S) / 4 mm [US6] 30 cm [12 inches] (for sizes M, L, XL) or 4 mm [US6] double-pointed needles. Join the work to knit in the round and place a marker at the beginning of the round.
Work 9 (9) 10 (10) 11 (11) rounds in rib (K1, P1)
You should still have 38 (42) 48 (52) 58 (64) Sts on your needles.
Chest
Change to 5 mm [US8] / 30 cm [12 inches] (for sizes XXS, XS S) / 5 mm [US8] / 40 cm [16 inches] circular needles (for sizes M, L, XL) or 5 mm [US8] double-pointed needles. We will now make a raglan increase by working a Kfb on either side of the marker.
Round 1: K entire round
Round 2: Kfb, K to the last St in the round, Kfb.
You should now have 40 (44) 50 (54) 60 (66) on your needles.
Work Rounds 1-2 a total of 8 (10) 12 (14) 16 (18) times.
There are now a total of 54 (62) 72 (80) 90 (100) Sts on your needles.
Arm and Harness Holes
Round 1: Knit 2 (2) 3 (3) 4 (4), Kfb, BO 10 (11) 12 (14) 15 (17) Sts (begin BO using the extra St created with the Kfb), move remaining St from the BO from the right to the left needle, K2tog, Knit to the last 14 (15) 17 (19) 21 (23) Sts in the round, Kfb, BO 10 (11) 12 (14) 15 (17) Sts (begin BO using the extra St created with the Kfb), move remaining St from the BO from the right to the left needle, K2tog, Knit 2 (2) 3 (3) 4 (4)
Round 2: Knit 3 (3) 4 (4) 5 (5), CO 10 (11) 12 (14) 15 (17) Sts, Knit 28 (34) 40 (44) 50 (56), CO 10 (11) 12 (14) 15 (17) Sts, Knit 3 (3) 4 (4) 5 (5)
Round 3: K entire round
Round 4: Knit 24 (28) 33 (37) 42 (47), Kfb, BO 4 Sts (begin BO using the extra St created with the Kfb), move remaining St from the BO from the right to the left needle, K2tog, Knit to end of the round.
Round 5: Knit 25 (29) 34 (38) 43 (48), CO 4, Knit to end of the round.
You should still have a total of 54 (62) 72 (80) 90 (100) Sts on your needles.
Midsection
Work 6 cm (8 cm) 10 cm (12 cm) 13 cm (15 cm) / 2.25 inches (3 inches) 4 inches (4.75 inches) 5 inches (6 inches) in the round in stockinette stitch measured from the arm holes or until you’ve reached your desired length based on your dog’s length (Leave 3 cm [1 inch] extra for final ribbing).
Midsection ribbing
Place markers in the first and last 8 (9) 10 (11) 13 (14) Sts.
Round 1: Knit to the last 8 (9) 10 (11) 13 (14) Sts, Work ribbing (K1, P1) in last 8 (9) 10 (11) 13 (14) Sts
Sizes XXS, S, XL
Round 2: Work ribbing (K1, P1) in first 8 (X) 10 (X) X (14) Sts, K to the last 8 (X) 10 (X) X (14) Sts, Work Ribbing (K1, P1) in last 8 (X) 10 (X) X (14) Sts
Work Round 2 a total of 5 (X) 6 (X) X (7) times.
Ribbing Bind Off: (K1, P1) in the first 8 (X) 10 (X) X (14) Sts, Knit to the last 9 (X) 11 (X) X (15) Sts, Kfb, BO 8 (X) 10 (X) X (14) Sts (begin BO using the extra St created with the Kfb), remove marker, BO 8 (X) 10 (X) X (14) Sts, move remaining St from the BO from the right to the left needle, K2tog.
Sizes XS, M, L
Round 2: Work ribbing (P1, K1) in first X (9) X (11) 13 (X) Sts, K to the last X (9) X (11) 13 (X) Sts, Work Ribbing (K1, P1) in last X (9) X (11) 13 (X) Sts
Work Round 2 a total of X (5) X (6) 7 (X) times.
Ribbing Bind Off: (P1, K1) in the first X (9) X (11) 13 (X) Sts, Knit to the last X (10) X (12) 14 (X) Sts, Kfb, BO X (9) X (11) 13 (X) Sts (begin BO using the extra St created with the Kfb), remove marker, BO X (9) X (11) 13 (X) Sts, move remaining St from the BO from the right to the left needle, K2tog.
There are now a total of 38 (44) 52 (58) 64 (72) Sts on your needles.
Back Section
We will now work the back section in rows. The back section has a built-in i-cord edge.
NOTE: Since you already have one St on your right needle from the K2tog that you worked in the previous section, you will count that St as the first K1 in Row 1, as seen in the below step. See this step in the video tutorial here.
Row 1 (Right Side): K1, Sl 1 St purlwise Wyif, K2, Ssk, K to the last 6 Sts, K2tog, K2, Sl 1 St purlwise Wyif, K1
Row 2 (Wrong Side): Sl 1 St purlwise Wyif, K1, Sl 1 purlwise Wyif, P to the last 3 Sts, Sl 1 St purlwise Wyif, K1, Sl 1 St purlwise Wyif
Work Rows 1-2 until you have 20 (24) 28 (32) 34 (38) Sts left on your needles or until you’ve reached your desired length based on your dog’s length (Leave 3 cm [1 inch] extra for final ribbing).
Back Ribbing
Change to 4 mm [US6] circular needles (any length will work) or 4 mm [US6] double-pointed needles.
Work 5 (5) 6 (6) 7 (7) rows in rib (K1, P1)
You should still have 20 (24) 28 (32) 34 (38) on your needles.
Bind off your work and weave in your ends.
Pin it!
Feel free to save this dog sweater project on Pinterest for later by clicking here or on the picture below!
Thanks for checking out my pattern! Share your version of the Edinburgh Seamless Dog Sweater on Instagram using #CalicoRadioKnits & #EdinburghSeamlessDogSweater. I’d love to see what you create!
Update (Feb. 2023): As our furry friends come in all shapes and sizes, I have received a lot of messages requesting tailored patterns to fit their dog’s measurements. Due to time limitations, I can no longer give personalized instructions for individual dog measurements. I recommend using the gauge swatch as a point of reference and checking out how others have tailored this pattern on Ravelry.
Absolutely love this sweater and thank you for providing a tutorial for it as well. I have already gotten one sweater done and have started another, my 13 year old shih tzu will be the most fashionable little lady in the neighborhood.
Thank you so much, Mindy!! That is so great to hear :).
Thanks so much Mindy . The tutorial is so user friendly I managed to do one XL size for our Sirius and loved the pattern so much..
I’m sorry mentioned the name wrongly..It is you TARYN…Mindy name was by mistake..
No problem! I’m so glad the pattern worked well for you 🙂
Love this thank you for the tutorial, very well presented. Can’t wait to knit this…
Thank you, Caron!
Thank you for the fabulous pattern, with the prices of the heating I will be able to make sure my pooch is warm at least!
No problem, Joanne! Thanks for checking it out :).
Very nice tutorial! Thank you.
Can’t wait to make a sweater 🐾
Love your pattern! I have been looking for a pattern like yours for quite some time. The video is a special bonus and appreciated. Bella, my wee girl is a Shih tzu and as mentioned by someone else with the cost of heating this sweater will keep her warm and cozy. At present she has sock monkey sweater but I see diva sweaters in her future. Many thanks Taryn.
No problem, Caren, I’m so glad it could be of use :). All the best to and little Bella!
Caren,
What size did you make for your shih tzu? I’d like to make one for a friend.
Thanks
Diane
Is it possible to download the seamless dog sweater pattern?
Yes! You can find it above under the heading ‘Downloadable Pattern.’ There you’ll find a PDF of the complete pattern that you can download to print.
Hi! I’d love to make this for my dog, but his neck is 16 inches, chest 26 in, and length 23in.. do you think I could follow the XL pattern and add 6 cast on stitches to the neck per inch extra, and do you have any recommendations for what to add for the midsection?
Hi! I’d recommend casting on 72 stitches for the neck ribbing and for the chest, working the raglan increase until you have 120 stitches. If you follow the pattern for the chest section, the distance from the neck ribbing to the arm holes will be 8 inches. If you don’t want the chest section to be so long, you may consider working the raglan increase every row instead of every other, which will shorten the chest section to just 4 inches. You may need to tinker around to see what works best for your pup 🙂 Hope this helps!
Thank you so much.
Haven’t started this cute pattern yet.
It’s for my daughter’s supervisor’s dog.
Thank you.
Love the pattern! How can I determine how much yarn I’ll need for the different sizes?
Thanks
Hi Andrea, thanks 🙂 The size small takes 125 meters, but I unfortunately do not have the exact yardage for each of the other sizes. Sorry about that!
Thanks, that helps a bit.
Hi Taryn,
Just further on this, do you roughly know how many balls of yarn that is or the grams?
Many thanks.
Sandra
Hi Sandra,
Apologies for the delay! The small takes approx. 76 grams.
Hello Taryn.
Thank you for a well-written pattern and an excellent video guide.
I am trying this with my friend’s French bulldog, all neck and chest… 🙂
He measures 50cm at the neck, 85cm at the chest, 64cm at the stomach(mid), and 53cm waist (back). Neck to tail is about 35cm
I have started casting on 100 stitches (a double small) ~50cm
Do you have any tips/recommendations for the rest?
I see from another comment that working the chest increase and skipping Round 1 ( K round) could make it a more desired length (otherwise too long)
Hello Henrik,
No problem, thanks for check it out 🙂
Yes, you can remove the Knit round to reduce the chest length. If you start with 100 Sts at the neck and work the raglan increases normally until you have 154 Sts (approximately 85cm), the chest length will be 22-23cm long. If you remove the Knit round, the chest length will be shortened to approximately 11 cm.
For his chest to stomach, you could try working decreases (Ssk & K2tog) on either side of the stitch marker when knitting the midsection, rather than knitting it in straight stockinette. I haven’t personally tried this before though, so I can’t attest to how this would turn out unfortunately.
Thank you for the modified instructions. I am well on my way and have just passed the front leg holes.
I know how to make ssk&k2tog, can you clarify when to use each, at what side of the marker each should go?
I am reading it as
begin of round: SSK *knit to 2nd last* k2tog
repeat
I would recommend working a decrease round as follows:
Knit 1, K2tog, Knit until last 2 stitches of the round, Ssk.
Using Australian wool what is the ply of the wool required. Don’t have worsted tarn here. Is it 8 Ply or double knitting or chunky? Thanks
The pattern uses a 10 ply yarn.
Made this for my Chi-weenie,perfect fit by combining 2 sizes easy to custom fit can’t add a photo but my boy is very handsome in his new sweater
That’s so great to hear! I’m glad the pattern worked well for you 🙂
What a cute pattern a cutie model. I’m looking at knitting for a Westie puppy any idea what size I should make? I have no dog to base this on.
Thanks, Emma 🙂 I’m not very familiar with this dog breed, so I can’t give any advice on this unfortunately. Sorry about that!
These measurements are perfect for our two mini dachshunds, one takes the medium size and the other large. Thanks so much, they are hard to find jumpers that fit them.
I’m so happy to hear that, Linda! 🙂
Étant la maminou de 2 mini-teckels (mon fils et sa conjointe sont les propriétaires), et ayant commencé le manteau de la femelle, je me questionnais à savoir si je fais le même modele pour le mâle. J’ai peur que lorsqu’il urinera, que son urine mouille le dessous du manteau. Qu’en pensez-vous ?
Hello Suzanne! The sweater pattern is the same for both male and females, but I understand your concerns. For my male dog, I made the mid-section a bit shorter to help avoid this. The underside ribbing should also help reduce the chance that he urinates on it.
Hej jeg vil lige høre om opskriften på Seamless dog sweater ikke kan printes ud på dansk da jeg ikke er så god til engelsk.
Venlig hilsen Jette Andersen.
Danmark.
Hej Jette! Unfortunately, the pattern is only available in English. Sorry about that. /: But if you are interested, there is a video tutorial of the pattern that may help, if the English version is unclear: https://youtu.be/fgO-t8YM2y8
Google Oversæt:
Hej Jette! Desværre findes mønsteret kun på engelsk. Det er jeg ked af. /: Men hvis du er interesseret, er der en video tutorial af mønsteret, der kan hjælpe, hvis den engelske version er uklar: https://youtu.be/fgO-t8YM2y8
Hi! This is such a great pattern, I’m a beginner and was able to follow it really easily! I’m onto my third version.. first was a bit of a practice run for me, and unfortunately the second try didn’t quite fit my mini dachshund, so I’m making the next size up now! I really struggled to get her into it as the hole at the bottom seemed quite tight. Do you have any tips for getting the BO to be a little looser around the ribbing so that it stretches with the ribbing? Or a way to make the bottom hole larger to make it easier to get on and off? Thanks so much!
Hi Aimee, I’m so happy to hear that! One way to get the BO to be a bit looser is to go up a few needle sizes when binding off. These two stretchy BO techniques are my go-tos and will also provide you with a lot of stretchiness 🙂
VeryPink Knits Simple Stretchy Bind Off: https://youtu.be/SbzeEg6XMwM
Jeny’s Suprisingly Stretchy Bind Off: https://youtu.be/X1hD4mYE3RE
Hello,I am not able to work out how many stitches to do on a xxs pattern for the arm holes do I knit just knit 2 or 4 and if I knit before the bo stitch do I only knit 1.? I hope that makes sense to you< I over think patterns at times so I hope you dont think me batty. LOL.
Hi Heather!
I think I understand your question :). To start the round, you are going to knit the first 2 stitches normally. Then in the 3rd stitch, you are going to knit into both the front and back loops. This will create a new stitch, so you will have a total of 4 stitches on your needle for this round so far. Using that extra stitch you created, you are going to begin binding off for the arm hole.
You can also see how this is done in my video tutorial here: https://youtu.be/fgO-t8YM2y8?t=581.
I am making a small in the video tutorial, so the stitch count will be different from the xxs but the technique used will be the same.
Hope this helps!
How would I go about resizing this pattern to a much bigger size for my Doberman? Her measurements are 22″ neck and 35″ chest, I’m assuming I just increase the number of stitches I cast on?
Hi Robyn, you could increase the size of this pattern by using a thicker yarn and larger needles or increasing the amount of stitches you cast on. I recommend using the gauge swatch as a point of reference and checking out how others have tailored this pattern on Ravelry.
Yes! I just doubeld the needle size and this worked, also using a bulky yarn! Thank you for your reply 🙂
My mini dachs, 6 mos old Bailey, is medium neck size but his chest size 15,75, i.e. size small,( medium is 17.75.) How much give should there be in chest? And how to adjust size if 2 inch give is too much. Maybe with maturity chest will increase? Thanks, am not a very experienced knitter! Love pattern. Subscribed to your blog.
Hi Virginia 🙂 I’d suggest trying one of the following:
1. Since the neck section will be stretchy from the ribbing, you could try knitting a size small and using 5mm needles instead of 4mm for the neck to expand it a bit. Since you’ll work the neck first, you could try it on Bailey to see if it’s big enough before moving on with the rest of the sweater.
2. You could also initially work a medium neck and then switch to the directions for a small when working the chest. This will shorten up the chest section a bit (to approx. 3.25 inches). If you think that will be too short for Bailey, you could knit a few extra rounds of neck ribbing or work the raglan increase round (Round 2 of the chest section) less frequently to compensate.
Speaking from experience though, Bailey’s chest may likely get bigger as he matures – My mini doxie Mac was 6 months old when I designed this pattern, and he originally had a size small chest. He’s 1.5 years old now and is closer to a medium-sized chest.
Hope this helps 🙂
I’m looking forward to making this little pet sweater, if it fits an animal that will be a bonus! There are a few new techniques to master in this well-written pattern, the the video tutorial will hopefully help me figure everything out! Thank you so much for sharing all of this.
No problem, Aurora! I’m so glad you like it – if you have any questions along the way, please don’t hesitate to let me know 🙂
Oh my gosh, Taryn this pattern is wonderful! The PDF and YouTube video are so great. I made it for my cat, it fits perfectly, and I learned quite a few new techniques. Thank you so much for sharing this! I posted the pics on Ravelry. ❤️
I’m so happy to hear that Jeannette!! No problem at all🙂❤️
moi, j’ai fait une recherche sur google vidéo avec ssk et k2tog et j’ai trouvé facilement.
I love this pattern and your video is really helpful. Thank you for taking the time. I don’t even have a dog but I make it for my friend’s dogs. They love it. Somehow, I always get a very loose stitch and a hole at the beginning of the leg opening (where we add the kfb). I try to figure out what I do wrong but can’t. Any suggestions? Thank you 🙂
Hi Sonia, my apologies for the delayed response! In this case, you could skip the kfb and instead knit the stitch normally before casting off for the leg hole. The kfb at the beginning of the cast off and the k2tog at the end of the cast off is included to reduce any holes, so if it’s causing them for you, you can omit them entirely 🙂
I love how perfectly the chest design works for my barrel-chested dachshund! I made her the medium, and it fits her so well!!
This worked out perfect! I made 3 sweaters for very lucky dogs. Your instructions were very clear. Do you have any other tutorials for knitting?
I am so happy to hear that, Cecelia! I am working on another knitting pattern/tutorial for a dog sweater with sleeves that I hope to release soon 🙂
Hi! I really love this pattern and as a beginner knitter (this is my first project!) I appreciate how clear it is!
I do have one doubt though-I am having trouble in the “back section” going between row 1 and row 2 isn’t working for me as the end of row two is a slip purl so when I flip back to the “right side” for row 1, the working yarn is a stitch back and the knit stitch to start row 1 is not working through the last purl slip from row 2. Any advice? I’ve replayed the video many times and think I’m doing it correctly but it never turns out right so I’m stuck here ! Hope this explanation is clear.
Thank you:)
Hi Sarah! I’m honored you’re using the Edinburgh sweater as your first project 🙂 Hmm, regarding your question, I’m not entirely sure what you mean by “working through the last purl slip from row 2.” It does sound like you are doing it correctly though! The working yarn should be a stitch back when you complete Row 2 and begin Row 1. If you haven’t worked a lot of rows yet, I’d recommend working a few rows and see how the I-cord looks. Usually, it will look a little wonky to start, but will clean up nicely after working a few rows. You can also check out this video tutorial for the same I-cord, which may be clearer than my video: https://www.youtube.com/watch?v=9lVisnXB4_8
Just finished a sweater for my oldest dog and this is just too cute! Thank you so much and Happy New Year!
Thank you for sharing your pattern and video tutorial for this sweater, I taught myself to knit last year, and came across this which looked perfect to try for my dogs. I just finished my 2nd one (fits better than the first), and could not have done either without the video. I made a few adjustments for my 20 lb Chinese Crested “Cocoa” and it came out fine. It was my first attempt at knitting in the round. Now to find that perfect stocking hat pattern for my wife. Thanks again!
Tim (66 year old retired guy)
Ok great pattern Love it. And video. Been knitting 30 years and learned from you. Thanks I do think that in the midsection ribbing, there may be issue. If you use sizes with odd number ribbing, you end round with a knit and start next round with knit. No problem as round begins under dog. I was wondering why you didn’t just begin 1st round with ribbing? I’m probably wrong and/or missing something. Also, do you do your cast on with larger needles? Video said “I change to smaller needles? Or did were you referring to length? You’ve been great with answering. Completely understand if you don’t get to respond to me and even more impressed than I already am with you if you do.
Hi Maggie, thank you for bringing this to my attention! Regarding the midsection ribbing, you are absolutely right. I will need to edit the pattern to specify that sizes with odd number ribbing need to start their Round 2 ribbing as (P1, K1) rather than (K1, P1).
Regarding the video comment, where I say to change to smaller needles, I meant that the needle (cable) length is smaller 🙂
Thank you again, Maggie!
Best tutorial I have ever seen. Love the fact that the sweater is seamless and the raglan makes it look very sophisticated! I have three dachshunds and will be making them these. Thank you so much for making this a free pattern!
Excellent pattern and video. You are such a good instructor! Thank you for providing such clear, concise and easy to follow directions!
Thank you so much for this lovely pattern,it has so much potential with different colours etc. However I do have a slight problem, I recently finished it for my miniature dachshund, which fits perfectly but as soon as she rolls around with it on her front legs disappear inside and her paws get stuck . Any advice on how to tighten around the leg holes or make them smaller? It was my first attempt and I think the yarn maybe too stretchy and too thin ( DK). I will use Aran next time.
Any advice would be much appreciated from a seasoned knitter.
Tracey B
In the UK
Hi Tracey, I completely understand as a fellow mini dachshund owner 🙂 It does seem like it often comes down to the stretchiness of the knitted fabric. I’ve had issues with some superwash yarns that stretch too much. Or if the sweater comes out even slightly too big, which has happened to me on quite a few occasions. I often will work a sweater with slight negative ease for my dog, so it fits very snuggly. Another thing I have seen other knitters do is to add a round of single crochets around the armholes to tighten and flatten the arm holes.
Thank you I try going down a size and also do a row of crochet around the leg holes .
Thanks again